Showing posts with label Java. Show all posts

Thursday, June 5, 2014

A chat application with WebSockets, Java and jQuery


I'm not going to describe the WebSockets protocol here - you can find zillions of tutorials online. In this short article I show how to build a simple chat application based on WebSockets.

The good news is that you don't have to worry about the nitty-gritty details of parsing WebSockets headers and packets, that's already implemented by open source libraries. On top of those you can write a server in Java, C#, Python, etc.
I use Tyrus, which makes it so easy to implement the server side of my chat application.
First I need to create a host for my endpoint:

package server;

import java.io.BufferedReader;
import java.io.InputStreamReader;
 
import org.glassfish.tyrus.server.Server;
 
public class WebSocketServer {
 
    public static void main(String[] args) {
        runServer();
    }
 
    public static void runServer() {
        Server server = new Server("localhost", 8025, "/chat", ChatEndpoint.class);
 
        try {
            server.start();
            BufferedReader reader = new BufferedReader(new InputStreamReader(System.in));
            System.out.print("Please press a key to stop the server.");
            reader.readLine();
        } catch (Exception e) {
            throw new RuntimeException(e);
        } finally {
            server.stop();
        }
    }
}

Look at the line where I create the Server object: I'll deploy ChatEndpoint to localhost:8025/chat.
Now I need to create the server itself - this ChatEndpoint type:
package server;

import java.io.IOException;
import java.util.Queue;
import java.util.concurrent.ConcurrentLinkedQueue;
import java.util.logging.Level;
import java.util.logging.Logger;
 
import javax.websocket.CloseReason;
import javax.websocket.OnClose;
import javax.websocket.OnMessage;
import javax.websocket.OnOpen;
import javax.websocket.Session;
import javax.websocket.CloseReason.CloseCodes;
import javax.websocket.server.ServerEndpoint;
 
@ServerEndpoint(value = "/test")
public class ChatEndpoint {
 
    private Logger logger = Logger.getLogger(this.getClass().getName());
    // keep all open WebSocket sessions (from all users)
    private static Queue queue = new ConcurrentLinkedQueue<>();

    @OnOpen
    public void onOpen(Session session) {
        logger.info("Connect with session: " + session.getId());
        queue.add(session);
        logger.log(Level.INFO, "Connected with " +  session.getId());
    }
 
    @OnMessage
    public void onMessage(String message, Session session) {
        logger.log(Level.INFO, "Mesage received " + message);
        try {
            // broadcast message to all open WebSocket sessions
            for (Session s : queue) {
             // include the original sender
             s.getBasicRemote().sendText(message);
             logger.log(Level.INFO, "Message sent: " + message);
            }
         } catch (IOException e) {
            logger.log(Level.INFO, e.toString());
         }
        // we could have a return here, in which case the returned string
        // would be the one sent from server to client,
        // as if doing s.getBasicRemote().sendText(message)
        //return message + "TEST";
    }
 
    @OnClose
    public void onClose(Session session, CloseReason closeReason) {
        logger.info(String.format("Session %s closed because of %s", session.getId(), closeReason));
        queue.remove(session);
        logger.log(Level.INFO, "Connection closed with " + session.getId());
    }
}
Tyrus makes things easy for us. Look at the annotation @ServerEndpoint(value = "/test") - here I'm saying that my server is accessible under the relative path "/test" under the URL mentioned before, thus the whole URL becomes: localhost:8025/chat/test.

We have three more annotations:
@OnOpen to mark the method for opening the connection from a client to this server; here session uniquely identifies the connecting client
@OnClose to mark the callback triggered when the connection with a particular client closes
@OnMessage for the method that does the most important job: whenever a message is received from a client, this method broadcasts the message to all clients (including the sender)

That's all on the server side.
So now the client is a simple web page with some jQuery embellishments:

<!DOCTYPE html PUBLIC "-//W3C//DTD HTML 4.01 Transitional//EN" "http://www.w3.org/TR/html4/loose.dtd">
<html>
<head>
<script type='text/javascript' src='jquery.js'></script>
<script type='text/javascript' src='jquery-ui-1.8.23.custom.min.js'></script>
<script type='text/javascript'>
var wsocket;
function connect() {
   wsocket = new WebSocket("ws://localhost:8025/chat/test");
   wsocket.onmessage = onMessage;
   alert("Connect");
}

function onMessage(evt) {
   $("#chatText").append("\n" + evt.data);
}

$(document).ready(
  function() {
$("#connect").click(
function() {
wsocket = new WebSocket("ws://localhost:8025/chat/test");
wsocket.onmessage = onMessage;
}
);

$("#send").click(
function() {
wsocket.send($("#username").val() + ":" + $("#tosend").val());
$("#tosend").val("");
}
);
  }
);
</script>

<meta http-equiv="Content-Type" content="text/html; charset=ISO-8859-1">
<title>Chat</title>
</head>
<body>
Username: <input type="text" id="username"><br>
<input type="submit" value="Connect" id="connect">
<input type="submit" value="Disconnect"><br><br>

<textarea rows="30" cols="50" id="chatText">
</textarea><br>
<textarea rows="4" cols="50" id="tosend">
</textarea>
<br>
<input type="submit" value="Send" id="send">

</body>
</html>


Note how we open the connection with the server:  new WebSocket("ws://localhost:8025/chat/test").
Sending messages from the client to the server is simple too: wsocket.send($("#username").val() + ":" + $("#tosend").val());

Incredibly easy, isn't it ? 
Oh, by the way, this is the list of jars I need for the application to compile (you can use Maven to simplify the deployment a bit):


Sunday, January 5, 2014

Maven tips and tricks


Maven is cool. Reading the official tutorial on the Maven website, you get a pretty good idea what it does and how it works. The tutorial fails to tell you though the most important thing: follow the Maven conventions and it will work fine; if you don't follow them, Maven won't help, better forget about it.
One of the Maven conventions is the standard directory layout (read here). As long as your project's directory structure looks like in the following figure, using Maven is ok:


Note that under the src/main you need to have your "java" directory for the java source code, "webapp" for the JSP/JSF pages (the eventual web application) and "resources" for some important files (read on, I'll give an example).

However, if you happen to develop a web application under Eclipse, your directory structure will be quite different:


Trying to use Maven now to build and deploy this Eclipse project is doomed to fail. The simplest solution to produce the war you need is to use Export from File menu under Eclipse and choose Web -> "WAR file".

For my own purposes I needed to use Maven, so I first moved the Eclipse project around in order to mimic the directory structure desired by Maven (as shown in the first figure above). From that point on, I learned some simple lessons:

1. as you've noticed, whenever you run a Maven phase/goal, Maven downloads all libraries necessary and places them under your local C:\Users\myUserName\.m2\repository; this is very powerful, as you can use Maven out of the box with a "tabula rasa" computer and end up with a neatly deployed project with all references solved

2. I wanted to add to my Maven project a dependency to an existing jar, so here it's what I've done:

   mvn install:install-file -DgroupId=com.mycompany.test -DartifactId=testid -Dversion=1.0 -Dpackaging=jar -Dfile=/path/to/jarfile/f.jar

This resulted in copying the desired dependency, f.jar, somewhere under .m2/repository.

I added then the following to my pom.xml:
<dependency>
     <groupId>com.mycompany.test</groupId>
     <artifactId>testid</artifactId>
     <version>1.0</version>
 </dependency>


3. by the way, while running mvn package you'll most likely get error messages referring to missing classes; to fix this, just look for the missing class online, e.g.:


Containing JAR files:

As you can see, findjar.com gives you links to Maven2 repositories. Following these links will tell you what artifactId and version you'll need to include in your pom.xml in order to fix this dependency.

Or even better, just go to the Central Maven Repository and look there for the missing class. Finally you'll get to the page that shows you exactly what you need to include in your pom.xml (you can copy-paste it):


4. if you're using Hibernate (high likelihood I'd say), add your hibernate.cfg.xml to /src/main/resources; moreover, all other Hibernate configuration files, e.g. Patient.hbm.xml, must be added to the corresponding /resources subdirectory; I needed to add all my .hbm.xml files to /src/main/resources/model; after you run mvn package, they end up in the war file under WEB-INF\classes\model

5. since you're packaging a web application, add the following to your pom.xml:


 <build>  
    <plugins>  
     <plugin>  
      <groupId>org.apache.maven.plugins</groupId>  
      <artifactId>maven-war-plugin</artifactId>  
      <version>2.4</version>  
     </plugin>  
    </plugins>  
 </build>  

------------------

The following is the pom.xml file I'm using for my project:

 <project xmlns="http://maven.apache.org/POM/4.0.0"  

  xmlns:xsi="http://www.w3.org/2001/XMLSchema-instance"  
  xsi:schemaLocation="http://maven.apache.org/POM/4.0.0  
            http://maven.apache.org/xsd/maven-4.0.0.xsd">  
  <modelVersion>4.0.0</modelVersion>  
  <groupId>com.mycompany.app</groupId>  
  <artifactId>app</artifactId>  
  <version>1.0-SNAPSHOT</version>  
  <packaging>war</packaging>  
  <dependencies>  
   <dependency>  
    <groupId>junit</groupId>  
    <artifactId>junit</artifactId>  
    <version>3.8.1</version>  
    <scope>test</scope>  
   </dependency>  
   <dependency>  
     <groupId>javax.servlet</groupId>  
     <artifactId>javax.servlet-api</artifactId>  
     <version>3.0.1</version>  
     <scope>provided</scope>  
   </dependency>  
   <dependency>  
     <groupId>org.hibernate</groupId>  
     <artifactId>hibernate-core</artifactId>  
     <version>3.6.3.Final</version>  
   </dependency>  
   <dependency>  
     <groupId>javax.faces</groupId>  
     <artifactId>jsf-api</artifactId>  
     <version>1.2_02</version>  
   </dependency>  
   <dependency>  
     <groupId>org.apache.openejb</groupId>  
     <artifactId>openejb-jee</artifactId>  
     <version>3.1.1</version>  
   </dependency>  
   <dependency>  
     <groupId>commons-logging</groupId>  
     <artifactId>commons-logging</artifactId>  
     <version>1.1.3</version>  
   </dependency>  
   <dependency>  
     <groupId>com.mycompany.test</groupId>  
     <artifactId>testid</artifactId>  
     <version>1.0</version>  
   </dependency>  
  </dependencies>  
  <build>  
    <plugins>  
     <plugin>  
      <groupId>org.apache.maven.plugins</groupId>  
      <artifactId>maven-war-plugin</artifactId>  
      <version>2.4</version>  
     </plugin>  
    </plugins>  
  </build>  
 </project>  


Enjoy Maven, folks !

Sunday, October 27, 2013

Write Once Run Anywhere .... if you can

Let's see. A few weeks back my hard-drive crashed and I needed to replace it. Luckily, I had saved my data previously, among which a Java-based application with 3 tiers: JSF, jQuery, servlets, and an open-source database. I wanted thus to resurrect this application. "Piece of cake" I told to myself, Java is after all WORA (Write Once Run Anywhere).
So this is what I've done:

  1. downloaded and installed Eclipse Juno (which didn't start on double-clicking the exe, but rather using this command line: C:\eclipse\eclipse.exe -vm "C:\Program Files\Java\jre7\bin")

  2. I want to run this application on Apache Tomcat and Glassfish application servers, so after downloading and installing both, I needed to download server adapters, as shown in the following figure (see "Download additional server adapters" in the figure below)

Note that I tried first with Glassfish 4.0.

3. I created a Dynamic Web Project in Eclipse and imported the sources of my project (saved from the previous hard-drive)

4. Then, as I was building the project, I noticed missing required jar files, so I started looking for them (either jarfinder.com or findjar.com) and adding them to \WEB-INF\lib

At this point in time I thought everything should work fine. 
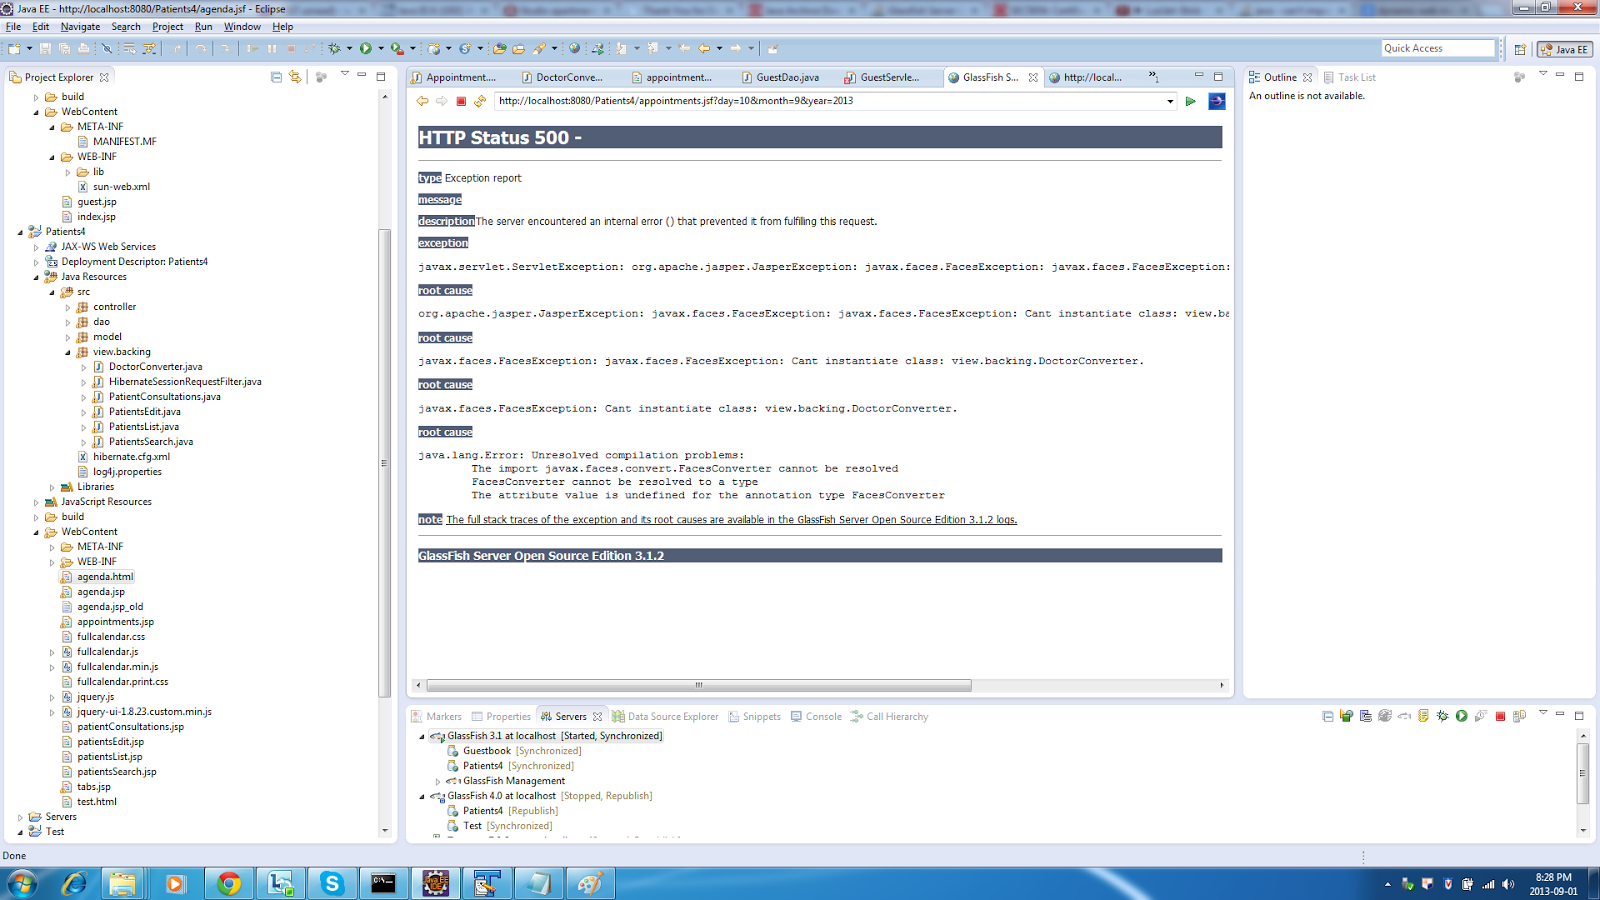
But first I encountered a strange run-time exception, as shown below:

5. After a bit of searching online, it turned out I needed to configure Project Facets to use Dynamic Web Project 3.0, as shown below:

Note: it's very important to select the right Project Facets, because that decides what jars will be used. Fro example, if you don't choose the JSF facet, then you need to add the JSF jars yourself; sometimes there's a good reason to do just that, e.g. the default provided jars won't do the job, so you want to use other jars.

6. As you can see, Eclipse complained about the Java version, so I needed to use the Java 7 compiler, as shown in the following figures:


7. After all this hassle, my application worked, but only with Glassfish 3.1; on 4.0 it throws an NPE; on Tomcat, no way to make it work, even though the same application previously worked ONLY on Tomcat and not on Glassfish ....

By the way, in the past I also had an issue with an application working fine on the former Oracle OAS and not working at all on Tomcat. It turned out that replacing the standard Oracle JSF libs with the ones from Mojarra helped. But you never know ....

I need to investigate this further, but now I'm happy at least I made it work on Glassfish 3.1.

Greetings from the jungle,
    Sorin


P.S. A great article about JSF 2.0 with Glassfish and Eclipse is here: http://balusc.blogspot.nl/2011/01/jsf-20-tutorial-with-eclipse-and.html.


Sunday, December 11, 2011

Java Pet Store 2.0 - the architecture (part 1)

To my surprise, the Java Pet Store 2.0 page, even though recently updated, still doesn't mention much about the design of the application.
So here we go, below you find some diagrams and explanations over how it's built and how it works. I'll continue the story in future posts, here I start with the overview and show how the catalog gets displayed.

First, check out this part of the web.xml file:

<servlet>
        <display-name>ControllerServlet</display-name>
        <servlet-name>ControllerServlet</servlet-name>
        <servlet-class>com.sun.javaee.blueprints.petstore.controller.ControllerServlet</servlet-class>
    </servlet>
    <servlet-mapping>
        <servlet-name>ControllerServlet</servlet-name>
        <url-pattern>/catalog</url-pattern>
    </servlet-mapping>

It tells that the ControllerServlet needs to be used for URLs that match the pattern "/catalog".
For example, when following the link "Dogs" on the main page, we navigate to:
http://localhost:8087/petstore/faces/catalog.jsp?catid=Dogs
(I have Glassfish running on localhost:8087)
Since this matches the "/catalog" pattern, ControllerServlet.service() is triggered, as shown in Figure 2.
The ControllerServlet implements the FrontController J2EE pattern and delegates to various actions (see Figure 1 and Figure 2), depending on the servlet path. In this case the servlet path is "/catalog" and it maps to CatalogXmlAction. The latter reads the "command" parameter from the request and, because this one is "categories", it calls the CatalogFacade to get the categories via JPA (note in Figure 1 that "Category" is a JPA Entity).


Figure 1: The main entities involved in fetching the catalog

Figure 2: Displaying the catalog

The CatalogXml action, once it has the categories, it writes them to the response (HttpServletResponse) in JSON format (see below).
So how come, given this JSON format, the categories and the pets are so nicely displayed in the page (see Figure 3) still ?  Well, this is done with a bit of Dojo/JavaScript magic. 


[{"id":"CATS","catid":"CATS","name":"Cats","description":"Loving and finicky friends","imageURL":"cats_icon.gif",
"products": [{"id":"feline01","catid":"CATS","name":"Hairy Cat","description":"Great for reducing mouse populations",
"imageURL":"cat1.gif"},{"id":"feline02","catid":"CATS","name":"Groomed Cat","description":"Friendly house cat keeps you 
away from the vacuum","imageURL":"cat2.gif"}]},
etc.
]


Figure 3: The Pet Store application - after choosing the categories

Take a look at catalog.js, which is used in catalog.jsp to format the page:

function loadAccordion () {
        // go out and get the categories
        // this should be made more geric
        var bindArgs = {
            url:  applicationContextRoot + "/catalog?command=categories&format=json",
            mimetype: "text/json",
            load: function(type,json) {
               ac.load(json);
               processURLParameters();
             },
             error: ajaxBindError
        };
        dojo.io.bind(bindArgs);
    }


This method is called from initCatalog() in catalog.js, which in turn is called in catalog.jsp:

<script type="text/javascript">
    dojo.event.connect(window, "onload", function(){initCatalog();});
</script>


Finally, loadAccordion() calls ac.load(json) and ac.showCategory(params.catid), where "ac" is AccordionMenu() (the menu with categories in Figure 3), which again, sends us to:


this.load = function(lcategories) {
        categories = lcategories;
        // create all the rows
        for (var l=0; l &lt; categories.length; l++) {
            var row = createRow(l,"accordionRow", ITEM_HEIGHT);
            createLinks(row.div, categories[l].name, l, "accordionLink");
            divs.push(row);
        }
    }

Here, createLinks() makes the links on the left-hand side menu ("Cats", "Dogs", etc.), using categories[l].name as parameter. "Categories" come from the JSON shown above, retrieved in loadAccordion(): url:  applicationContextRoot + "/catalog?command=categories&format=json".

this.showCategory = function(catid) {
        for (var l=0; l < categories.length; l++) {
            if (catid == categories[l].name) {
                // now tell the scroller to load the first product
                initiateExpansion(l);
                if (categories[l].products[0]) {
                    dojo.event.topic.publish("/catalog", {type:"showProducts", productId:categories[l].products[0].id});
                } 
                break;
            }
        }
    }

Notice here "type" and "productId" labels. Back in catalog.js, we do:
dojo.event.topic.subscribe("/catalog", this, handleEvent);

So here we subscribe to the "/catalog" events with the callback "handleEvent", which does:

else if (args.type == "showProducts") {
          is.reset();
          populateItems(args.productId, 0, 0, true);
      }


Here, args.type is the label "type" we published above and args.productId is the label "productId". With the argument args.productId, "populateItems()" displays the images, etc. In order to do that, it uses DOM fields from catalog.jsp, e.g.:


var targetElement = document.getElementById("bodySpace");

To be continued ....


Thursday, March 31, 2011

Java Forever

What else can I add ?

Sunday, November 21, 2010

Debugging Java PetStore with Glassfish and Eclipse

Once I made PetStore work in Glassfish, I wanted to debug it in Eclipse.

1. I ran asadmin in my application server path:
C:\J2EE\Sun\AppServer\bin>asadmin start-domain

2. In the browser, I ran the application server Admin Console, available in my case at localhost:4848

3. I went to Application Server menu (top left), I chose JVM Settings and I enabled Debug

4. I restarted the Application Server (after enabling Debug and saving this configuration, I noticed the link "Restart needed" top left; I clicked on it, after that I ran asadmin start-domain from the console)

5. I also ran asadmin start-database to start the database for PetStore

6. I started Eclipse (I use version 3.4.1); under Run menu, I chose "Debug configurations ...."; then I chose the PetStore project (which I had created previously in Eclipse) and port 9009 (the default port where Glassfish is listening for debuggers); I also enabled "Allow termination of remote VM"

7. Just for the test, I put a breakpoint in ImageAction.java, method service; then I started the debug configuration created at bullet 6; finally, I navigated in a browser to
 http://localhost:8087/petstore/faces/catalog.jsp
and I clicked a dog under Pets; I could see my breakpoint being hit.

Sunday, September 5, 2010

Making Java PetStore work

Recently I've been struggling with making the Pet Store 2.0 application work.
So, shortly, what I've done:
-  downloaded the jar from https://blueprints.dev.java.net/petstore/
-  downloaded Glassfish v2.1.1 from https://glassfish.dev.java.net/

Then I tried to deploy and run the Pet Store by running the following commands:
- in the application server directory /bin: 
asadmin start-domain
asadmin start-database

- in the Pet Store demo directory C:\J2EE\PetStore\latest\javapetstore-2.0-ea5:
ant setup
ant run


Even though all commands were successful, the application won't start. More specifically I got the error "The requested resource () is not available" when navigating to http://localhost:8087/petstore.

So, without further ado, these are the steps I've performed to make it work.

1. in C:\J2EE\PetStore\latest\javapetstore-2.0-ea5\bp-project\build.properties I corrected the following variables:
a. javaee.home to point to my application server: c:/J2EE/Sun/AppServer
b. javaee.server.username to point to my username (the one I used when I installed Glassfish)
c. javaee.server.passwordfile to point to ${javaee.home}/samples/passwordfile

2. I created the file "passwordfile" under c:/J2EE/Sun/AppServer/samples containing a single line:
 AS_ADMIN_PASSWORD=myPassword (the password I chose when I installed Glassfish)


3. I also updated the file app-server.properties in C:\J2EE\PetStore\latest\javapetstore-2.0-ea5\bp-project with javaee.home=c:/J2EE/Sun/AppServer

At this point, I got the Pet Store demo running on the Glassfish server (after running again "ant setup" and "ant run"). However, only the first page was properly shown (http://localhost:8087/petstore/) and as soon as I navigated to "Enter the Store" (http://localhost:8087/petstore/faces/index.jsp), I saw a blank page.


Note: instead of running "ant run", you can also deploy the petstore.war from the /dist directory (or from /build) by using the Glassfish admin console:


By looking at the logging of the "ant setup" command I noticed that there was some issue with the username/password when trying to install the connection pool. I could also see this by inspecting the Glassfish log files (in the admin console, at http://localhost:4848/). So, I've done the following:

4. instead of relying on the ant script to install the connection pool and the data source (i.e. the ant setup command), I installed them by hand using the Glassfish admin console; see below the general properties of the connection pool:


Also, note the "Additional Properties":


Here I had to add the following properties: 
- Password with the value APP (I know this from the file app-server.properties, see 3),
- DatabaseName with the value petstore (I found this by googling the web)

At this point if you click Ping under the General tab, you should get the message "Ping succeeded".


5. I also installed the data source (using the Glassfish admin console), which I called jdbc/PetstoreDB (I know this from the web.xml file):


Finally, I could navigate to http://localhost:8087/petstore/faces/index.jsp and got the Pet Store demo working properly ! (of course, don't forget to start the DB server and the application server by running:
asadmin start-domain
asadmin start-database
)


Saturday, June 19, 2010

Invoke code on a certain thread in Java

I think Java should be a bit jealous on the .NET's interesting feature of being able to invoke a piece of code on any given thread. In .NET that's possible by creating a Control (say myControl) on a certain thread and then using myControl.Invoke or myControl.BeginInvoke having as parameter the piece of code you want to invoke on that thread. The parameter is a delegate, another feature missing in Java, but let's ignore this for now.
In Java we have SwingUtilities.invokeAndWait and SwingUtilities.invokeLater to invoke code on the event dispatching thread, but not on any given thread. They take a Runnable as parameter.

So how would we implement such a feature in Java ? We'll need a thread that has nothing better to do but try to dequeue items from its queue and invoke them (the items would be the pieces of code that we need invoked on that thread). Something like this:

package threading;


import java.util.concurrent.BlockingQueue;
import java.util.concurrent.LinkedBlockingQueue;


public class Invoker {
    
    private static Thread myThread;
    private static BlockingQueue<Task> queue;
    
    private Invoker() {
    }
    
    public static void BeginInvoke(Task task) {
        if (myThread == null) {
            queue = new LinkedBlockingQueue<Task>();
            myThread = new MyThread(queue);
            myThread.start();
        }
        if (Thread.currentThread() != myThread) {
            try {
                queue.put(task);
            } catch(InterruptedException e) {
                e.printStackTrace();
                Thread.currentThread().interrupt();
            }
        } else {
            task.perform();
        }
    }


}


And the actual thread (I simulate the .NET delegate by using Java anonymous classes):


package threading;


import java.util.concurrent.BlockingQueue;


public class MyThread extends Thread {
    private final BlockingQueue<Task> taskQueue;
    
    public MyThread(BlockingQueue<Task> queue) {
        taskQueue = queue;
    }
    
    public void run() {
        while(true) {
            try {
                Task currentTask = taskQueue.take();
                currentTask.perform();
            } catch (InterruptedException e) {
                e.printStackTrace();
                // Restore the interrupted status
                Thread.currentThread().interrupt();
            }
        }
    }


}


We need an interface for our task - either an existing one (Swing uses Runnable), or a new one, like:

package threading;


public interface Task {


    void perform();
}


Finally, the test class with the main method:


package threading;


public class Test {


    public static void main(String[] args) {
        System.out.println("main thread: " + Thread.currentThread().getId() + " " + Thread.currentThread().getName());
        Invoker.BeginInvoke(new Task() {
            public void perform() {
                System.out.println("perform task on thread: " + Thread.currentThread().getId() + " " + Thread.currentThread().getName());
                
            }
        });
        Invoker.BeginInvoke(new Task() {
            public void perform() {
                System.out.println("perform task again on thread: " + Thread.currentThread().getId() + " " + Thread.currentThread().getName());
                
            }
        });
    }
}

It should come as no surprise the output:

main thread: 1 main
perform task on thread: 7 Thread-0
perform task again on thread: 7 Thread-0